
Trilobite
0.9.3
User Guide
|
|
Trilobite
0.9.3 |
|
|
|
|
|
Once
you've created a population of genotypes, the Genotype Population
Area of the Population
Editor Window may be used to interactively alter the population
content. This section will list and describe those features.
Topics on this page include:
Genotype Icons
Genotype
Info Balloon
Parent
Genotypes
Selections
Genotype
Pop-up Menu
Background
Pop-up Menu
Auditioning
Genotypes
Play/Stop
Audition Button
Settings
Genotype Fitness
Cut/Copy/Paste
Dragging
Genotypes
Dragging
Patches
Undo/Redo
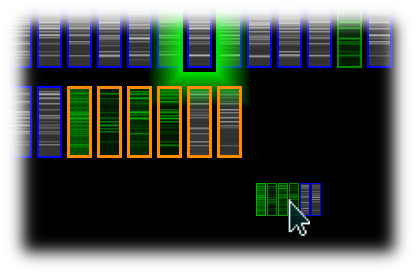
Once a population has been loaded from a file or a new population has been generated, the Genotype Population Area contains a set of graphical icons with shaded banding patterns, each of which represents the Genotype, or set of “genetic instructions,” for producing a Trilobite audio patch. The banded pattern of these icons is stylistically patterned after the genetic markers used in biological science, and differs for each genotype based on its content. If you examine these patterns carefully (perhaps obsessively) you may notice the similarity in pattern between parents and offspring, siblings, etc.
![]()
The coloration of each genotype icon indicates its fitness, where fitness values are integers in the range zero to ten. An icon with only shades of grey, such as the first one pictured above, has no assigned fitness and would be eliminated if the Fornicate Button were pressed. Icons with varying shades of green have assigned fitness, and will contribute their genes to the next generation of phenotypes with a probability proportionate to their fitness. The brighter the shade of green, the more fit the genotype; the icons above show ascending levels of fitness.
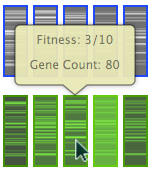
If
the mouse cursor is allowed to hover over a genotype icon, an
information bubble will pop up which shows the fitness and Gene
Count of the genotype. In the context of this user guide, a
genotype's gene count may be considered to indicate the complexity of
the patch it represents (although, as in the case of Ferns
vs. Humans, this is clearly often not the case).

Genotype
icons with yellow coloration and an internal circle pattern represent
fit parent genotypes from the last generation. If they are assigned
fitness, their yellow coloration will change to green and they will
continue breeding the next generation. If not assigned fitness they
will be deleted in the same manner as unfit child genotypes.
To take any direct action on genotypes within a population, you must select one or more genotypes first. When genotypes are selected, they will be outlined with a special border whose color depends on the current color scheme. Several population modes are availble:
|
Click Selection |
To select a single Genotype, left click on it with the mouse.
Note that when a Genotype is selected, its boundary color changes to the selection color. Any prior selections will be canceled by this operation, leaving only the Genotype just clicked in a selected state. |
|
Shift Drag Selection |
By holding down the shift key, then clicking and dragging, a selection rectangle may be be used to select multiple Genotypes.
Release the mouse button to complete the selection. Note that this operation extends the current selection, leaving previously selected Genotypes in their current selected state. |
|
Shift Click Selection |
By holding down the shift key while left-clicking on Genotypes, multiple Genotypes may be selected:
Note that this operation extends the current selection, leaving previously selected Genotypes in their current selected state. |
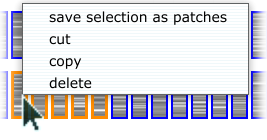
A right mouse click on any genotype icon will invoke a popup menu with the following options.
|
save selection as patches |
Selecting this option will translate all of the currently selected to Patches and display a save file dialog in which a location and name prefix may be specified for saving the patches as files. The name specified in the save file dialog will be used as a prefix for an enumerated list of patch names. For instance: Specifying the name “foo” for the Genotypes shown above will result in patches foo000.da_patch, foo001.da_patch, and foo002.da_patch saved in the specified folder. |
|
cut |
Selecting this option will copy any selected Genotypes to the application clipboard and then delete them from the population. This operation may be undone. Keyboard shortcut: Cntl-X |
|
copy |
Selecting this option will copy any selected Genotypes to the application clipboard, leaving the population and selection state unchanged. Keyboard shortcut: Cntl-C |
|
delete |
Selecting this option will delete the selected Genotypes from the population without first copying their state to the application clipboard. This operation may be undone. Keyboard shortcut: Delete |
Note that all of the menu options listed above are enabled only if the right click occurs within a selected genotype.
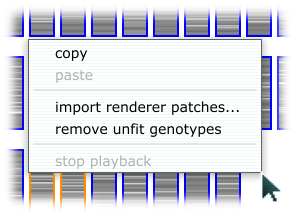
A
right mouse click anywhere in the background of the Genotype
Population Area will invoke a popup menu with the following options:
|
copy |
Selecting this option will copy any selected Genotypes to the application clipboard, leaving the population and selection state unchanged. This option is disabled if no genotypes are currently selected in the population. Keyboard shortcut: Cntl-C |
||
|
paste |
Selecting this option will remove any currently selected genotypes in the population, if any, and then add the contents of the Application Clipboard to the population (effectively replacing the previous selection). This option is enabled only if the Application Clipboard contains genotype information. This operation may be undone. Keyboard shortcut: Cntl-V |
||
|
import renderer patches... |
Selecting this option will invoke a file open dialog, in which one or more Trilobite Patch Renderer files (usually having suffix da_patch), may be selected. Once the the file dialog is dismissed by clicking the “Open” button, the selected patch files will be translated into genotypes and added to the population. This operation does not affect the current selection state. This operation may be undone. |
||
|
remove unfit genotypes |
Selecting this option has exactly the same effect as clicking the Kill Button: Any patches with zero fitness will be immediately removed from the population. This operation may be undone. |
||
|
Stop playback |
Selecting this option will immediately stop audible audition of genotypes and unload the translated patch currently loaded in the Population Synth Panel. See Auditioning Genotypes for more information. Keyboard shortcut: Esc
|
This sections discusses how to interactively set the reproductive fitness for each genotype in a population. This feature only works when the population is not in reproductive mode.
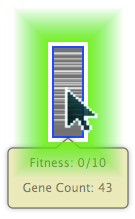
As
mentioned previously, a genotype icon represents a serial genotype
which may be translated into an audible renderer patch which may be
played, or in other words auditioned, via the user interface.
To audition genotypes, hold down the keyboard control key and drag
the mouse over each genotype in turn. As each genotype is auditioned,
it will be highlighted with a radiant green halo.
For convenience, the LEFT ARROW key and RIGHT ARROW key may be used to audition genotypes immediately to the left and right of the genotype currently translated.
When a genotype is selected for audition as described above, its patch translation is loaded into the population synth panel corresponding to the current population. When the patch translation of an auditioned genotype is loaded in the population synth panel, it is possible to view the patch in detail by double-clicking the panel's patch thumbnail window to show the corresponding Patch Editor Window. The patch may be modified directly from this window, but the only way to save changes is to drag the patch into a bank patch socket.
|
|
Lost work alert! |
Patch audition audio may be toggled by clicking the play button in the lower right hand corner of the genotype population area:
When Audition Mode is active, the button display the “stop” graphic. Clicking this button will stop the current genotype translated patch playback.

When Audition Mode is inactive, the button displays the “play” graphic. Clicking this button will activate genotype translated patch playback.

Keyboard shortcut for toggling this button is SpaceBar.
A genotype's user-specified fitness will determine the number of breeding opportunities it receives in the next Reproduction Cycle. Note that fitness values are relative among the population and constrained to the integer range [0, 10] for every genotype, so giving every chosen genotype the highest fitness value of 10 is the same as setting all of their values to 1.
To set the fitness of the genotype currently being auditioned, use the UP and DOWN arrow keys as follows:
The UP ARROW key will increase the genotype fitness by one point, up to a maximum of 10 points, and the genotype icon will turn a brighter shade of green.
The DOWN ARROW key will decrease the genotype fitness by one point, to maximum zero points, and the genotype icon will turn a darker shade of green.
Genotype fitness operations may be undone.
The genotype population area supports standard cut/copy/paste editing of genotype selections.
In detail, these editing features offer the following:
|
copy |
This option is available from population pop-up menus and when used will copy all selected genotypes within the current population to the Application Clipboard. Keyboard shortcut: Cntl-C |
|
cut |
This option is available from population pop-up menus and when used will perform the copy operation described immediately above, and then delete all selected genotypes from the population. Keyboard shortcut: Cntl-X This operation may be undone. |
|
paste |
This option is available from population pop-up menus and when used will first remove all selected genotypes, and then copy the genotype contents of the Application Clipboard (if any) to the population. Note that this feature allows pasting genotypes between populations. Keyboard shortcut: Cntl-V This operation may be undone. |
|
delete |
This option will delete all currently selected genotypes from the population. The Application Clipboard is not modified. Keyboard shortcut: Delete This operation may be undone. |
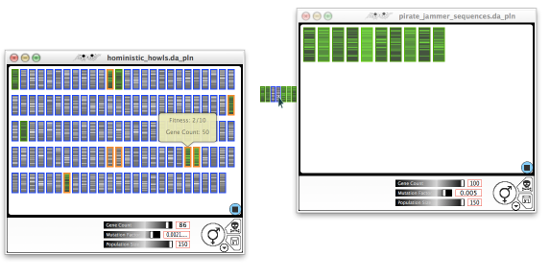
Genotype
selections may be dragged from one population into another. To do
this:
Left click the mouse on any selected genotype in the source population.
Drag the mouse to the destination population (the mouse cursor will be replaced by a graphical representation of the selected genotypes).
Release left mouse button within the destination population genotype area.
The selected genotypes will be copied to the destination population with their current fitness settings intact, and selection sets within the source and destination populations will remain unchanged.
This operation may be undone.
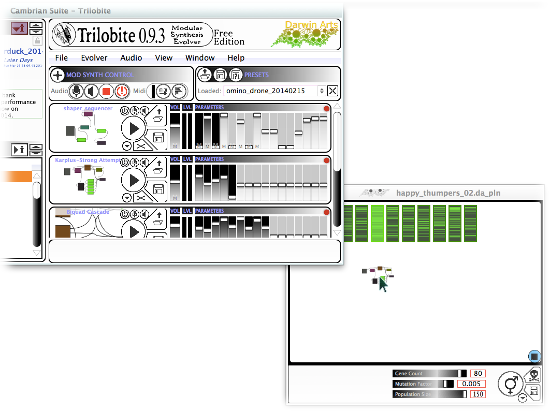
Patches
loaded in Modular
Synth Panels may be imported into populations by drag and drop
operations (as shown in image above). To perform this action:
Left click the mouse within the Patch Thumbnail Window of the modular synth panel.
Drag the mouse to the destination population (the mouse cursor will be replaced by a graphical representation of the patch being dragged).
Release the mouse button within the destination population genotype area.
The Modular Synth Patch will be translated to a serial genotype description and added to the genotype population as a visible genotype icon.
The drag patch operation may be undone.
The population editor provides an undo/redo transaction stack up to fifteen transactions deep. The undo and redo operations are not exposed as menu options, but are available as keyboard shortcuts:
To undo the last operation, use keyboard shortcut Cntl-U.
To redo the last operation that was undone, use keyboard shortcut Cntl-R.
Note that any new edit operation will reset the stack of edit operations which may be re-done.