Trilobite
0.9.3
User Guide

©
Darwin Arts L.L.C., 2014
|
|
|
|
|
|
Trilobite
0.9.3 |
|
|||
|
|
|
||||
The
Trilobite Patch Canvas may is the interactive editing environment for
Trilobite patches. This section describes the basic editing features
available for patch manipulation, including navigation features,
menus, patch layout, and selection modes.
Topics on this page include:
Background Popup Menu
Navigation
Features
Adding
Modules
Module Popup
Menu
Port Popup Menu
Module
Parameter Dialog
Making
Connections
Selections
Dragging
Selections
Undo/Redo Stack
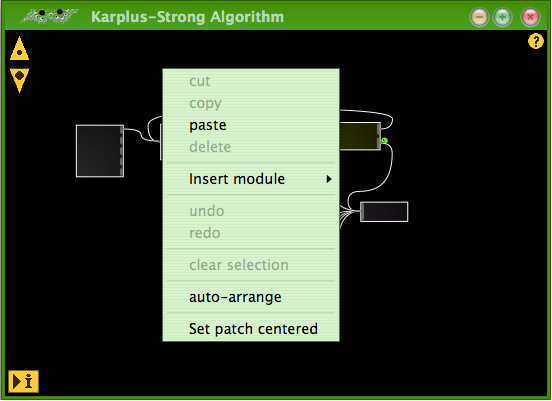
A mouse right-click anywhere in the background of the Patch Edit Canvas will display the main editor popup menu shown above.
Options include:
|
cut |
Selecting this option will place all currently selected Modules and their attached connections to each other in the Trilobite Copy/Paste Clipboard, and then remove these from the Patch. This option is only enabled if one or more Modules are selected. This operation may be reversed using the undo option in this menu. Keyboard shortcut: Cntl-X |
|
copy |
Selecting this option will place all currently selected Modules and their attached connections to each other in the Trilobite Copy/Paste Clipboard. This option is only enabled if one or more Modules are selected. This operation may be reversed using the undo option in this menu. Keyboard shortcut: Cntl-C |
|
paste |
Selecting this option will do the following:
This operation may be reversed using the undo option in this menu. This option is only enabled if the Trilobite Copy/Paste Clipboard contains a patch fragment from an earlier cut or copy operation. Note that it is possible to copy and paste content between two separate open patch editor windows. Keyboard shortcut: Cntl-V |
|
delete |
Selecting this option will remove any currently selected Modules and their attached connections from the Patch, leaving nothing selected. This operation may be reversed using the undo option in this menu. |
|
Insert module |
Selecting this option will open the Module selection submenu. |
|
undo |
Selecting this option will reverse the last edit operation which may be undone and pop that operation from the undo to the redo stack. See the Undo/Redo Stack section below for more information. If there is no action to be undone, this option is disabled. Keyboard shortcut: Cntl-Z |
|
redo |
Selecting this option will restore the last operation that was reversed using the undo operation, so long as intervening edit operations did not occur. See the Undo/Redo Stack section below for more information. If there is no option to be redone, this option is disabled. Keyboard shortcut: Cntl-R |
|
clear selection |
Selecting this option will turn off selected state for all Modules and connections in a patch. See the Selections section below for more information. Only enabled if one or more Modules are selected. Keyboard shortcut: Esc |
|
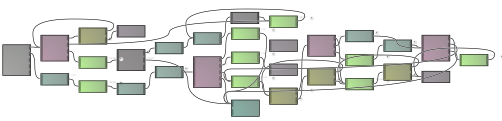
auto-arrange |
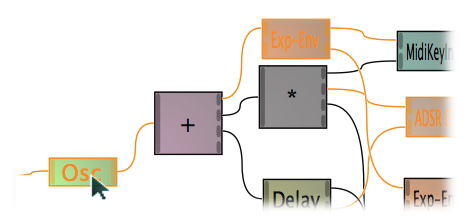
Selecting this option will rearrange the current patch for you in a “breadth first” fashion based on connections. In other words, the Output Module will be placed on the left side of the Patch Canvas, with Modules connected to its input ports situated in the next row, and their connected Modules situated in the next row, and so on recursively. Auto-arranged patches will have something like the following appearance:
|
|
Set patch centered |
Selecting this option will reset the zoom level and center focus position so that the entire patch is visible on the Patch Canvas. This is a useful option in the event that the patch is zoomed so far out as to be no longer visible. |
The visual editor allows patch viewing at any level of detail. This enables examination of very small details in very large patches.
Zoom in to see more detail, or to zoom out to see the larger patch layout use the Zoom Buttons.
To scroll the patch in any direction at the current zoom level, simply left click and drag on the Patch Canvas background to pull to a new viewpoint, much like moving a piece of paper across a tabletop with your fingertip.
In the event that you get lost navigating and can no longer find the patch, use the Set patch centered menu option discussed above.
|
|
For Macintosh users, zooming may also be achieved using pinch gestures. This may also be possible on some Win32 systems with multi-touch mouse pads, but there are no guarantees. |
New Modules are added to the Patch Canvas using the Insert Module menu option discussed above. Selecting that option will expand the following submenu:
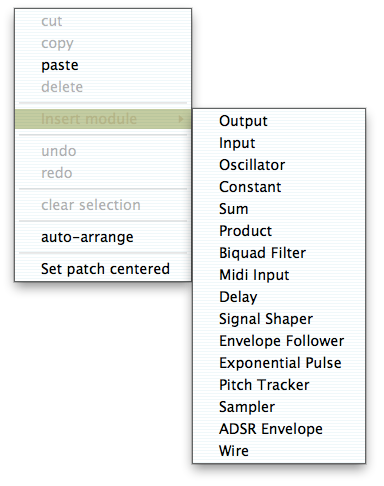
Select
any of the listed module types to insert a new instance of that
Module type at the mouse button down position. Individual Module
types are described in detail starting at the Modules
Types page.
There is a strict limit of only one Output Module in a patch, so selecting the Output menu option will do nothing if an Output Module is already present.
This operation may be reversed using the undo menu option.
This menu is shown when you right click on any Module within the Patch Canvas:
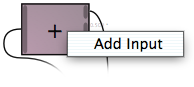
Click
the Add Input option to extrude an additional Module
Input Port. Some Module types will add more than one Input
Port when you do this because of grouping conventions for the signal
processing algorithm they implement.
For Module types which do not support adding Input Ports, the Add Input option will be disabled.
This operation may be reversed using the undo menu option.
This menu is shown when you right click on an Input Port of any Module:
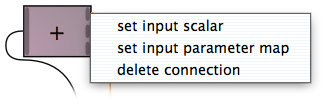
Options
include:
|
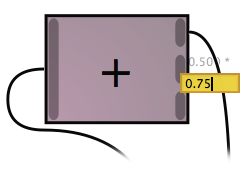
set input scalar |
Select this option to change the Input Port Scalar described in the Patch Basics page. The canvas will present a text entry box into which you type a decimal number:
This operation may be reversed using the undo menu option. |
|
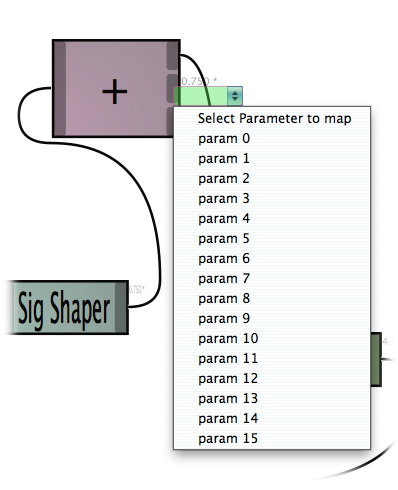
set input parameter map |
Select this option to change the Parameter Scalar mapped to this Input Port, as described in the Patch Basics page. The canvas will present a combo box from which you may select a preferred Parameter number:
This operation may be reversed using the undo menu option. |
|
delete connection |
Note that when you right click on a Module Input Port, the connection into that port is painted in the visual editor selection color. Selecting this menu option will delete the connection. This operation may be reversed using the undo menu option. |
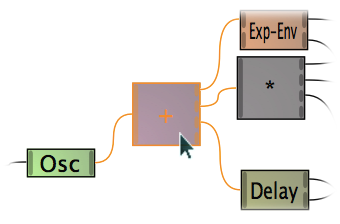
Every Module as a set of “static” parameters (parameters which remain fixed during standard patch usage outside the Visual Editor) which may be displayed in a special popup non-modal dialog. To access this dialog for a Module, double-click on on the Module and see the following:
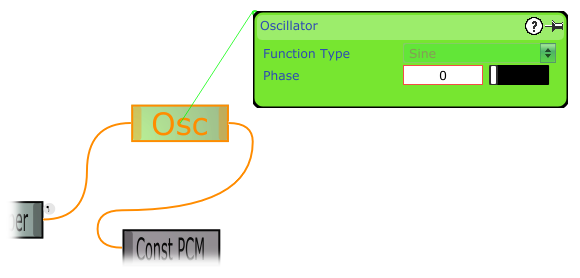
By
clicking and dragging on the Dialog title bar, you may drag it
anywhere within the Patch Canvas. A mouse click anywhere outside the
Dialog will cause the Dialog to become invisible until the Module is
double-clicked again. The Push Pin Button will prevent this,
as described below.
Features of the Module Parameter Dialog include:
|
Dialog Title |
This title indicates the Module Type for this module. In this case, the Module is an Oscillator. |
|
Context Help Button |
|
|
Push Pin Button |
|
|
Parameters Area |
The area of the Dialog below the title bar is devoted to Module static parameters. These parameters will vary for every Module Type. |
|
Association Line |
The green line between the Osc Module and the Parameter Dialog pictured above shows which Module the Dialog belongs to. This will help alleviate confusion for complex Patches. |
As changes are made to the parameters in the Dialog, the results will be immediately audible if the Patch is active.
Module Parameter Dialogs are not affected by Patch Canvas navigation, even if their target Module is navigated off screen.
Unfortunately, changes to Module static parameters using this Dialog may not be undone.
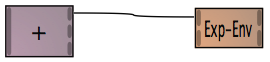
Making a connection between two modules establishes signal flow from the Output Port of the source module to the Input Port of the destination module. To make such a connection, left click on Output Port of the source module and drag your mouse cursor to the Input Port of the destination module. As you are dragging, you will see a straight dotted line from the Output Port to the immediate mouse position:
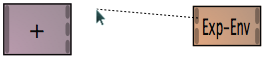
Drag the mouse to hover over the Input Port you wish to connect to, and release the mouse button to complete the connection:
Note
that if any connection was already made to the destination port when
you perform this operation, that connection will be eliminated.
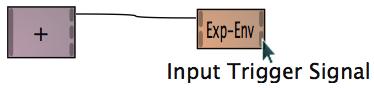
To see a brief description of Module I/O Ports, let the mouse cursor hover over the Port in question. A text description will appear after a brief pause, and then gradually fade out:
This operation may be reversed using the undo menu option.
Edit operations on patches are often predicated on being able to select which modules you wish to change. Trilobite offers the following modes and nuances of mode selection within a patch:
|
Click Selection |
To select a single Module, left click on it with the mouse:
Any prior selection will be cancelled by this operation, leaving only the module just clicked in a selected state. |
|
Shift Drag Selection |
By holding down the shift key, then clicking and dragging, a selection rect may be be used to select multiple modules:
|
|
Shift Click Selection |
By holding down the shift key while left-clicking on Modules, multiple Modules may be selected:
|
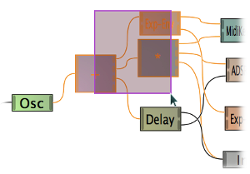
To move a single module around on the Canvas, left click on the module (which selects it) and drag it to the desired position, then release. The module will move with your mouse cursor and its connections will remain intact.
To move multiple Modules around at the same time, first select the modules as described above, then left click on any of the selected modules and drag the entire selection to the desired position, then release.
This operation may be reversed using the undo menu option.
Trilobite maintains a patch change transaction stack ten layers deep. In other words, using the undo menu option documented above, the last ten patch changes may be reversed to restore the patch to an earlier state. Conversely, these changes may be restored using the redo menu option...unless a new patch change has occurred. Any new patch change after using the undo option will delete any possible redo states.
Note that saving the patch will empty the patch change transaction stack, thereby disabling the undo and redo menu options until changes occur.
|
|
Lost work alert! |
|
|
|
|